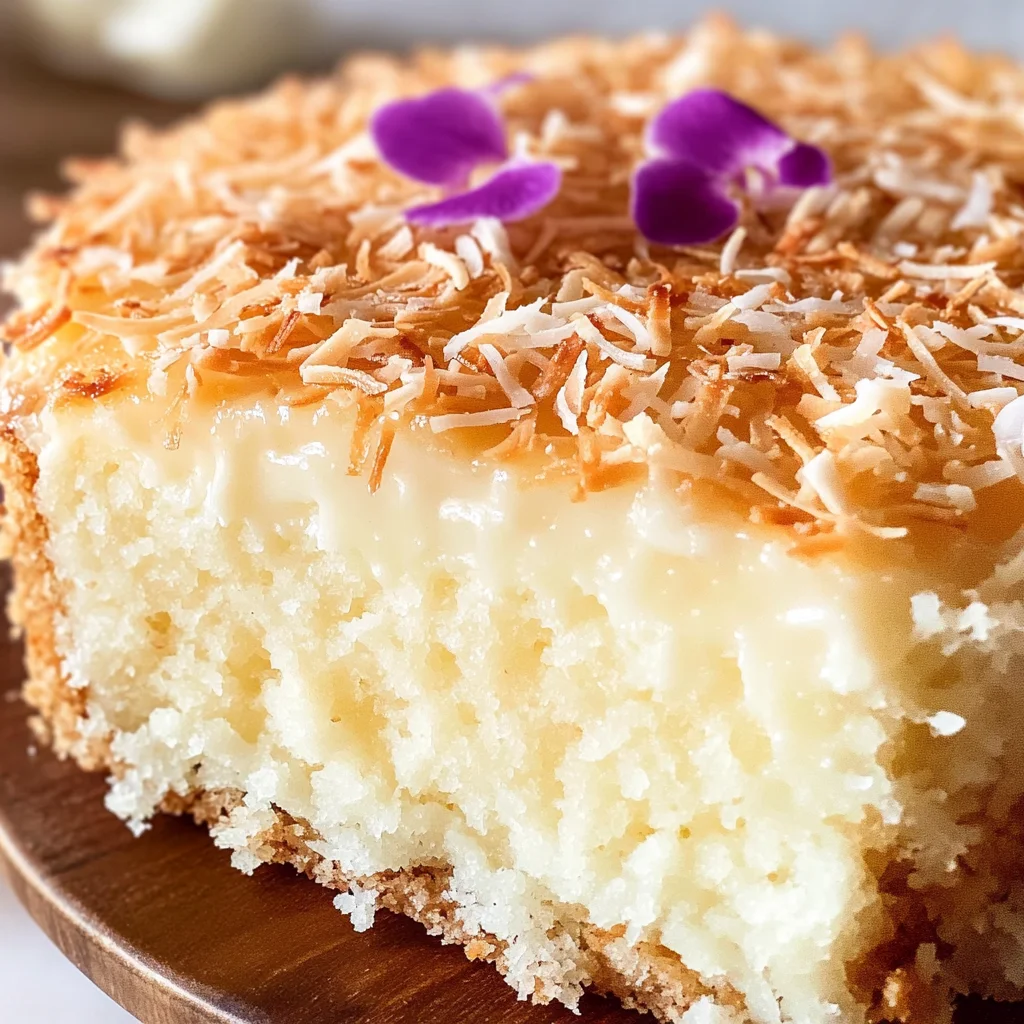
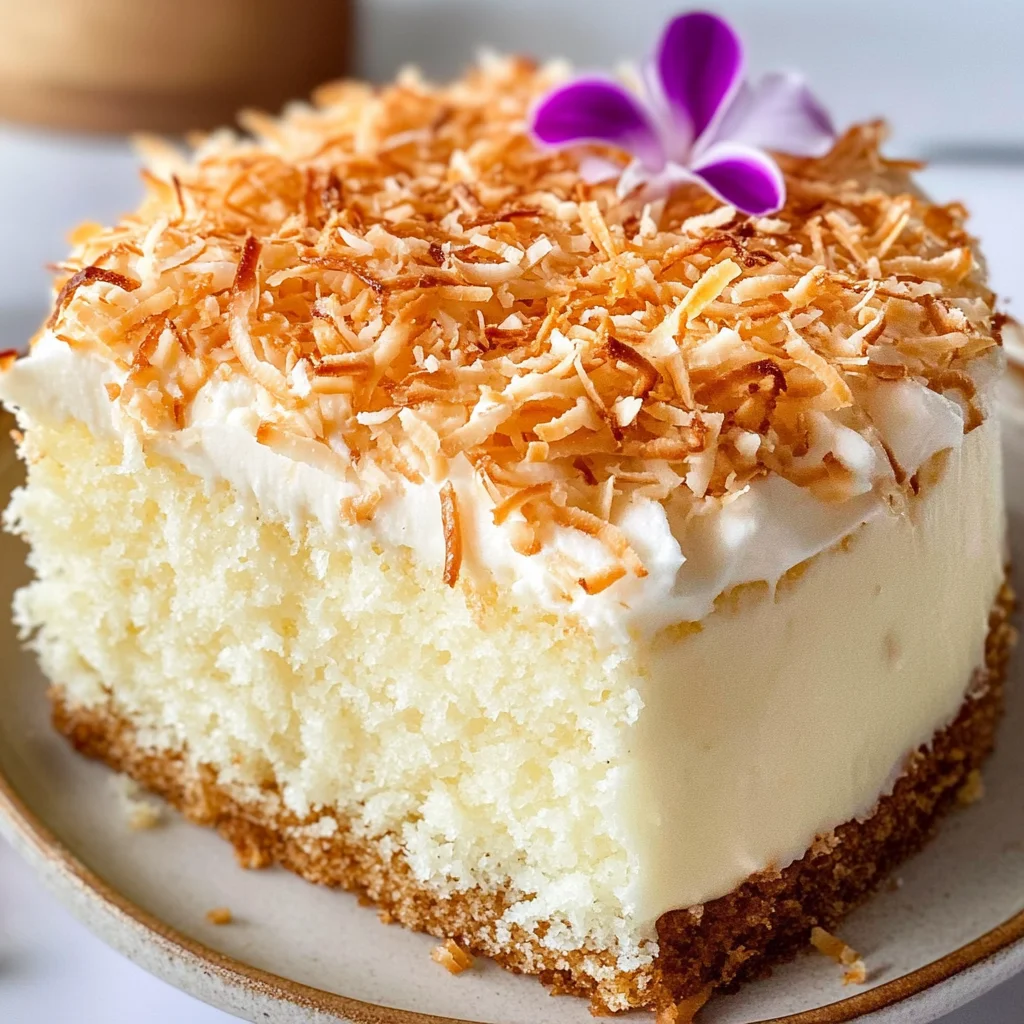
Sticky Coconut Cake
If you’re looking for a delightful dessert that’s both simple and scrumptious, then you must try this Sticky Coconut Cake! This gluten-free Indonesian treat is a true gem, brimming with the rich flavor of coconut. It’s perfect for busy weeknights or family gatherings where you want to impress everyone without spending hours in the kitchen. Trust me, once you take that first bite, you’ll understand why this recipe has a special place in my heart.
What makes this Sticky Coconut Cake so special is its unique texture and taste. It’s soft, slightly chewy, and packed with coconut goodness. Whether you’re serving it as an after-dinner treat or as a sweet snack during the day, it’s sure to be a hit!
Why You’ll Love This Recipe
- Super Easy Preparation: With just a few simple steps, you’ll have a delicious cake in no time.
- Family-Friendly Appeal: Kids and adults alike will love the sweet coconut flavor!
- Make-Ahead Convenience: This cake tastes even better after spending some time in the fridge.
- Gluten-Free Option: Perfect for those avoiding gluten without sacrificing taste or texture.
Ingredients You’ll Need
Let’s talk about the ingredients! They’re all simple and wholesome, making this recipe not only easy to prepare but also delightful to enjoy. Here’s what you’ll need to whip up your Sticky Coconut Cake:
- 2 eggs (separated)
- 1¼ cup granulated sugar
- 2¼ cup full fat canned coconut milk
- 3 cups shredded sweetened coconut
- 1½ cup glutinous rice flour
- 1 teaspoon vanilla extract
Variations
One of the best things about this Sticky Coconut Cake is how flexible it can be! Feel free to get creative with these variations:
- Add some zest: Incorporate some lime zest for a refreshing twist.
- Try different toppings: Top with toasted coconut flakes or even a drizzle of chocolate sauce!
- Mix in fruits: Add some chopped mango or pineapple to give it an extra fruity flavor.
- Experiment with spices: A pinch of cinnamon or cardamom can add warmth and depth to the taste.
How to Make Sticky Coconut Cake
Step 1: Preheat Your Oven
First things first, preheat your oven to 350° F. This step is crucial because it ensures that your cake bakes evenly and comes out perfectly fluffy.
Step 2: Whisk It Up
In a medium bowl, whisk together the egg whites and sugar until they are well combined. Slowly mix in the coconut milk, shredded coconut, glutinous rice flour, and vanilla extract. Make sure there are no lumps—this batter should be nice and smooth!
Step 3: Bake It
Pour your batter into an 8×8-inch baking pan. Pop it into your preheated oven and bake for about 45 minutes. You want to see that beautiful golden color on top!
Step 4: Brush on Egg Yolk
Once baked through, carefully take out the pan and brush the egg yolks on top of the cake. This step gives your cake that lovely golden brown finish when broiled for an additional 5-10 minutes. Just keep an eye on it so it doesn’t brown too much!
Step 5: Cool Down
Let your cake cool completely on a wire rack at room temperature. Then cover it with plastic wrap and pop it in the fridge overnight (or at least for 8 hours). This allows the flavors to meld beautifully.
When you’re ready to serve, cut your sticky coconut cake into squares or triangles. Enjoy it chilled from the fridge or at room temperature—either way, it’s heavenly!
Pro Tips for Making Sticky Coconut Cake
Making a perfect Sticky Coconut Cake is all about attention to detail and a little love in the kitchen. Here are some tips to help you achieve that delightful, sticky texture and rich flavor!
-
Use fresh coconut: Fresh shredded coconut enhances the cake’s flavor and texture compared to dried coconut. If possible, opt for unsweetened fresh coconut for a more authentic taste.
-
Mix thoroughly: Ensure that all ingredients are well combined to avoid lumps in your batter. A smooth batter helps the cake bake evenly and contributes to that wonderful, sticky consistency.
-
Watch the broiling closely: When broiling the cake, keep a close eye on it! It can go from perfectly golden to burnt in just seconds. Broiling adds a nice caramelized layer on top that enhances flavor.
-
Chill before serving: Allowing the cake to chill in the fridge overnight firms it up, making it easier to cut into neat squares or triangles. Plus, the flavors meld beautifully when given time to rest.
-
Experiment with add-ins: Feel free to get creative by adding ingredients like chopped nuts or dried fruits into the batter before baking. This can add extra texture and flavor variations!
How to Serve Sticky Coconut Cake
Presenting your Sticky Coconut Cake beautifully can make it even more delightful for guests! Here are some ideas on how you might serve this delectable treat.
Garnishes
- Toasted coconut flakes: Sprinkle toasted coconut on top of each slice for added crunch and a visual appeal.
- Fresh mint leaves: A few sprigs of mint can add a pop of color and freshness, enhancing both presentation and taste.
Side Dishes
- Tropical fruit salad: A refreshing mix of mango, pineapple, and kiwi complements the richness of the sticky cake while adding a burst of natural sweetness.
- Coconut whipped cream: Light and airy coconut whipped cream pairs beautifully with this cake, offering a creamy contrast.
- Green tea: The subtle bitterness of green tea balances out the sweetness of the cake, making for a harmonious dessert experience.
- Ice cream: A scoop of dairy-free ice cream (like coconut or vanilla) adds an indulgent touch that pairs well with this tropical delight.
With these serving suggestions in mind, you’re ready to impress friends and family with your delicious Sticky Coconut Cake! Enjoy every bite!
Make Ahead and Storage
This Sticky Coconut Cake is perfect for meal prep, as it can be made in advance and stored easily. Whether you’re planning for a gathering or just want to have a sweet treat ready at home, this cake holds up beautifully!
Storing Leftovers
- Allow the cake to cool completely before storing.
- Cover the baking pan with plastic wrap or transfer pieces to an airtight container.
- Store in the refrigerator for up to one week.
Freezing
- Cut the cake into individual portions for easy thawing.
- Wrap each piece tightly in plastic wrap, then place them in a freezer-safe bag or container.
- Freeze for up to three months for best quality.
Reheating
- For best results, allow frozen pieces to thaw in the refrigerator overnight.
- Enjoy cold directly from the fridge, or warm slightly in the microwave for 10-15 seconds if desired.
FAQs
Here are some common questions about making Sticky Coconut Cake that might help you out!
Can I use different types of coconut milk for Sticky Coconut Cake?
Yes! While full-fat canned coconut milk provides rich flavor and texture, you can use light coconut milk if you’re looking for a lower-calorie option. Just be aware that it may affect the cake’s richness.
How long does Sticky Coconut Cake last?
When stored properly in the refrigerator, Sticky Coconut Cake will last up to one week. It also freezes well, making it a great make-ahead dessert.
Is Sticky Coconut Cake gluten-free?
Absolutely! This recipe uses glutinous rice flour instead of wheat flour, making it completely gluten-free while still delivering that delightful sticky texture.
What should I serve with Sticky Coconut Cake?
Sticky Coconut Cake pairs beautifully with fresh fruits like mango or pineapple. You can also enjoy it alongside whipped coconut cream for an extra indulgent treat!
Final Thoughts
I hope you find joy in making this delightful Sticky Coconut Cake! It’s not only a delicious treat but also brings that wonderful tropical vibe right into your kitchen. Whether you’re sharing it with loved ones or savoring it all by yourself, this cake is sure to impress. Happy baking, and don’t forget to make some sweet memories along the way!
Sticky Coconut Cake

Discover the delightful flavors of Sticky Coconut Cake, a simple yet scrumptious dessert that will captivate your taste buds! This gluten-free treat hails from Indonesia and is packed with rich coconut goodness. Whether you’re hosting a family gathering or simply want to enjoy a sweet snack, this cake is sure to impress without requiring hours in the kitchen. With its soft, slightly chewy texture and a hint of vanilla, each bite transports you to a tropical paradise. Easy to make and even easier to enjoy, this cake is perfect for any occasion.
- Prep Time: 15 minutes
- Cook Time: 45 minutes
- Total Time: 1 hour
- Yield: Approximately 16 servings 1x
- Category: Dessert
- Method: Baking
- Cuisine: Indonesian
Ingredients
- 2 eggs (separated)
- 1¼ cup granulated sugar
- 2¼ cup full-fat canned coconut milk
- 3 cups shredded sweetened coconut
- 1½ cup glutinous rice flour
- 1 teaspoon vanilla extract
Instructions
- Preheat your oven to 350°F.
- In a medium bowl, whisk together the egg whites and sugar until well combined. Gradually mix in coconut milk, shredded coconut, glutinous rice flour, and vanilla extract until smooth.
- Pour the batter into an 8×8-inch baking pan and bake for about 45 minutes until golden brown.
- Brush the egg yolks on top of the baked cake and broil for an additional 5-10 minutes, watching closely.
- Allow cooling at room temperature before refrigerating overnight for best flavor.
Nutrition
- Serving Size: 1 square (50g)
- Calories: 190
- Sugar: 16g
- Sodium: 25mg
- Fat: 10g
- Saturated Fat: 9g
- Unsaturated Fat: 0.5g
- Trans Fat: 0g
- Carbohydrates: 23g
- Fiber: 1g
- Protein: 3g
- Cholesterol: 62mg