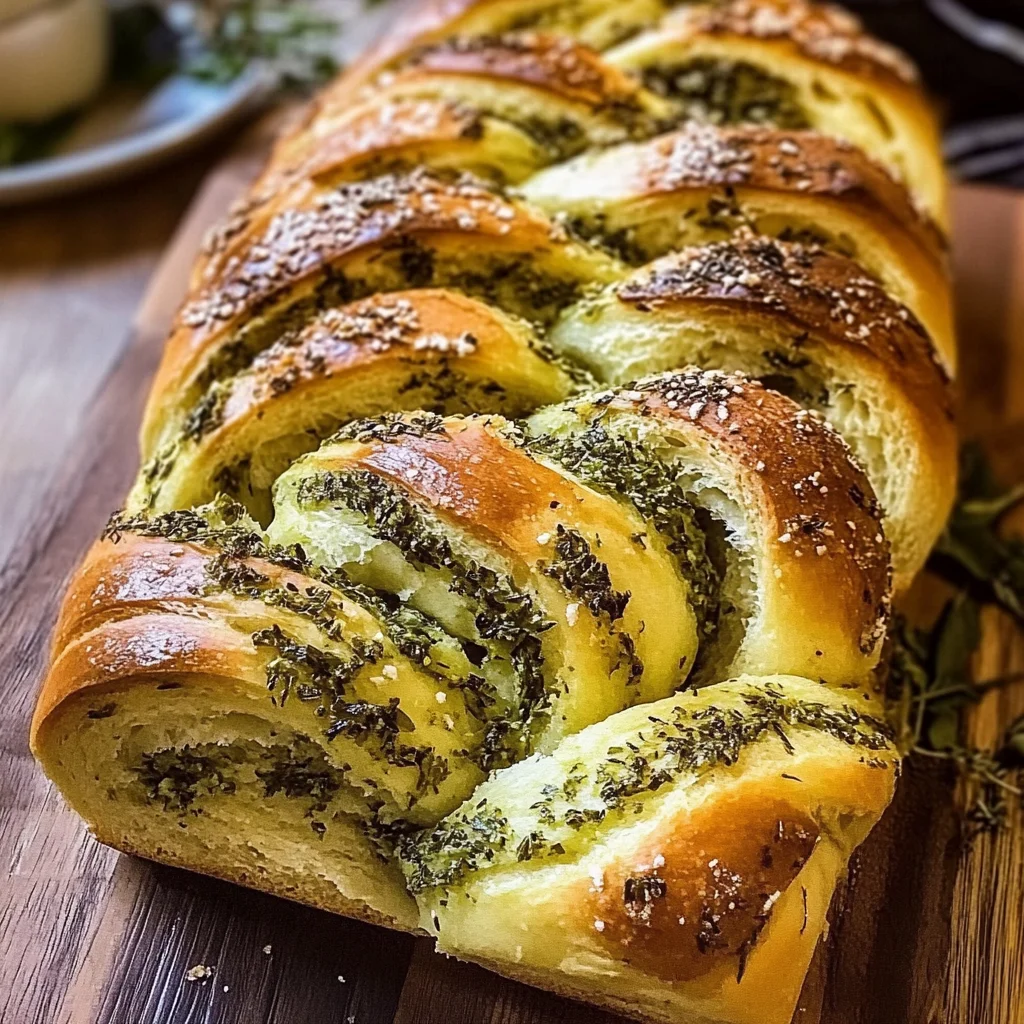
Swirled Garlic Herb Bread
If you’re looking for a recipe that is not only delicious but also fills your kitchen with delightful aromas, then you need to try this Swirled Garlic Herb Bread. This homemade loaf is soft, buttery, and beautifully infused with fresh herbs and garlic. I can guarantee that the moment you pull it out of the oven, your family and friends will be drawn to its warm, inviting scent!
What I love about this bread is its versatility. It’s perfect for busy weeknights when you want something comforting, yet it also shines at family gatherings or holiday meals. Whether served warm with a pat of butter or alongside a hearty soup or pasta dish, this Swirled Garlic Herb Bread will become a cherished part of your culinary repertoire.
Why You’ll Love This Recipe
- Easy to Make: The steps are simple enough for beginners, so you’ll feel like a pro in no time!
- Impressive Presentation: The twisted design looks stunning on any table—perfect for impressing guests.
- Flavorful: The combination of garlic, herbs, and parmesan creates a taste that’s simply irresistible.
- Great for Meal Prep: This bread can be made ahead of time and enjoyed throughout the week.
- Family Favorite: Kids and adults alike will love tearing off pieces of this fluffy goodness!

Ingredients You’ll Need
For this Swirled Garlic Herb Bread, you’ll need some simple and wholesome ingredients that work harmoniously together. Here’s what you’ll gather:
For the Dough
- ¾ cup warm whole milk
- 2 ¼ teaspoons instant yeast
- 2 tablespoons honey
- 3 large eggs
- 3 ½ – 4 cups all-purpose flour, plus more for rolling
- 1 teaspoon kosher salt
- 6 tablespoons salted butter, at room temperature
For the Herb Filling
- 1-2 cloves garlic, grated or finely chopped
- ¼ cup freshly grated parmesan cheese
- ½ cup fresh basil, finely chopped
- 2 tablespoons chopped fresh thyme
- 1 tablespoon chopped fresh sage
These ingredients come together to create a loaf that is rich in flavor and has a lovely texture. Let’s dive into how to make it!
Variations
This recipe is wonderfully flexible! Here are some fun variations to consider:
- Add More Cheese: If you’re a cheese lover, sprinkle in some mozzarella or feta for an extra cheesy twist.
- Mix Up the Herbs: Feel free to use other herbs like rosemary or oregano based on your preference.
- Make It Spicy: Add some red pepper flakes to the herb butter for a kick of heat!
- Try Different Flours: You can experiment with whole wheat flour or even gluten-free blends if needed.
How to Make Swirled Garlic Herb Bread
Step 1: Activate the Yeast
Start by combining warm milk, instant yeast, and honey in a large mixing bowl. Let it sit for about 5 minutes until it becomes foamy. This step is essential because it shows that your yeast is active and ready to help the bread rise.
Step 2: Mix the Dough
Add in your eggs, 3 ½ cups of flour, and salt into the yeast mixture. Whether you’re using a dough hook or mixing by hand, combine until everything comes together. If the dough feels too sticky, don’t hesitate to add in more flour gradually. Now introduce 2 tablespoons of softened butter and knead for about 5 minutes until the dough turns smooth and elastic—it should feel like a cozy pillow!
Step 3: Let the Dough Rise
Cover your bowl with plastic wrap and place it somewhere warm for about an hour. You want it to double in size—this rising time is crucial as it helps develop that lovely airy texture we all adore in bread.
Step 4: Prepare the Herb Butter
While waiting for your dough to rise, mix together the remaining butter with grated garlic, parmesan cheese, basil, thyme, and sage in a small bowl. Set this aside; this flavorful spread will be what makes your bread truly special!
Step 5: Roll Out the Dough
Once risen, lightly flour your surface and roll out your dough into a rectangle measuring approximately 12×18 inches. Spread that luscious garlic herb butter evenly across your dough—don’t skimp on coverage!
Step 6: Shape the Bread
Now comes the fun part! Roll the dough tightly from one long side into a log shape. Slice down lengthwise with a sharp knife but keep one end intact. Twist those two halves over each other so all those beautiful herb layers show off! Coil it into an “S” shape and place it on a parchment-lined baking sheet.
Step 7: Second Rise
Cover your coiled masterpiece again and let it rise for another 45 minutes until slightly puffy. This final rise will ensure your bread is light and fluffy after baking.
Step 8: Bake the Bread
Preheat your oven to 350°F (175°C). Bake for about 30-35 minutes until golden brown on top and fully cooked through. For an extra boost of flavor right when it comes out of the oven, brush warm bread with additional butter!
And there you have it—your very own homemade Swirled Garlic Herb Bread! Enjoy every bite!
Pro Tips for Making Swirled Garlic Herb Bread
Baking bread can feel daunting, but with a few pro tips, you’ll be on your way to creating the perfect loaf!
-
Use fresh herbs: Fresh basil, thyme, and sage bring vibrant flavors that dried herbs simply can’t match. They not only enhance the taste but make your bread look beautiful as well.
-
Don’t rush the rising: Allow your dough to rise until it’s doubled in size. This step is crucial for developing a light and airy texture; impatience can lead to dense bread.
-
Knead until smooth: Kneading the dough thoroughly helps develop gluten, which gives your bread its structure. Aim for a smooth, elastic texture before letting it rise.
-
Experiment with cheese: While parmesan is delicious, feel free to swap in other hard cheeses like aged cheddar or pecorino for a different flavor profile. Each cheese will add its unique twist!
-
Brush with more butter: For an extra touch of indulgence, brush melted butter on top of the warm bread right after baking. It adds richness and enhances the aroma that fills your kitchen.
How to Serve Swirled Garlic Herb Bread
This Swirled Garlic Herb Bread is not only delicious but also visually appealing. Presenting it well can turn any meal into a special occasion!
Garnishes
- Chopped fresh herbs: Sprinkling some additional chopped basil or parsley on top of the bread just before serving adds color and freshness.
- Grated cheese: A light dusting of grated cheese just before serving can elevate the flavor profile and create a gourmet touch.
Side Dishes
- Creamy Tomato Soup: This classic pairing complements the garlic herb flavors perfectly. The acidity of the soup balances out the richness of the bread.
- Mixed Green Salad: A refreshing salad with lemon vinaigrette provides a nice contrast to the buttery bread and adds a healthy element to your meal.
- Roasted Vegetables: Seasonal veggies roasted until caramelized bring depth and earthiness that pair wonderfully with this savory loaf.
- Pasta Primavera: Lightly sautéed vegetables tossed with pasta create a colorful dish that harmonizes beautifully with the flavors of your garlic herb bread.
With these tips and serving suggestions, you’re sure to impress family and friends with your Swirled Garlic Herb Bread! Enjoy every slice!
Make Ahead and Storage
This Swirled Garlic Herb Bread is perfect for meal prep! You can easily make it ahead of time and store it for later enjoyment, ensuring you always have a delicious homemade bread on hand.
Storing Leftovers
- Allow the bread to cool completely.
- Wrap it tightly in plastic wrap or aluminum foil.
- Store it at room temperature for up to 2 days.
- For longer storage, refrigerate it for up to a week.
Freezing
- Slice the cooled bread before freezing for easy access.
- Wrap each slice individually in plastic wrap.
- Place the wrapped slices in a freezer-safe bag or container.
- Freeze for up to 3 months.
Reheating
- For individual slices, remove from the freezer and let them thaw at room temperature.
- Preheat your oven to 350°F (175°C).
- Place the slices on a baking sheet and warm them in the oven for about 10-15 minutes until heated through.
- Alternatively, use a toaster oven for quick reheating.
FAQs
Here are some common questions about making Swirled Garlic Herb Bread:
Can I make Swirled Garlic Herb Bread without fresh herbs?
Absolutely! If you don’t have fresh herbs, you can substitute with dried herbs. Just use about one-third of the amount since dried herbs are more potent.
How can I enhance the flavor of my Swirled Garlic Herb Bread?
You can experiment by adding different cheeses like mozzarella or cheddar. Mixing in spices like red pepper flakes or Italian seasoning can also elevate the flavor profile!
What should I serve with Swirled Garlic Herb Bread?
This delightful bread pairs beautifully with soups, salads, or pasta dishes. It’s also great served warm with butter as an appetizer or snack.
How long does it take to prepare Swirled Garlic Herb Bread?
The total time is approximately 2 hours and 35 minutes, including rising and baking time. It’s worth every minute for that homemade goodness!
Final Thoughts
I truly hope this recipe brings joy to your kitchen as much as it has to mine! The Swirled Garlic Herb Bread is not just about flavor; it’s about creating lovely moments around the table. Enjoy making this beautiful loaf, share it with loved ones, and savor every delicious bite. Happy baking!
Swirled Garlic Herb Bread
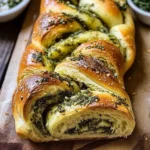
Swirled Garlic Herb Bread is a delightful homemade loaf that fills your kitchen with enticing aromas. This soft and buttery bread, infused with fresh herbs and garlic, is perfect for both casual dinners and special occasions. Its stunning twisted design not only makes it visually appealing but also allows the flavors to meld beautifully, creating an irresistible taste experience. Whether enjoyed warm with butter, paired with soup, or served alongside pasta dishes, this bread will quickly become a staple in your culinary repertoire.
- Prep Time: 90 minutes
- Cook Time: 35 minutes
- Total Time: 2 hours 5 minutes
- Yield: Approximately 12 servings 1x
- Category: Bread
- Method: Baking
- Cuisine: Italian
Ingredients
- ¾ cup warm whole milk
- 2 ¼ teaspoons instant yeast
- 2 tablespoons honey
- 3 large eggs
- 3 ½ – 4 cups all-purpose flour, plus more for rolling
- 1 teaspoon kosher salt
- 6 tablespoons salted butter, at room temperature
- 1–2 cloves garlic, grated or finely chopped
- ¼ cup freshly grated parmesan cheese
- ½ cup fresh basil, finely chopped
- 2 tablespoons chopped fresh thyme
- 1 tablespoon chopped fresh sage
Instructions
- Activate the Yeast: Combine warm milk, instant yeast, and honey in a large bowl. Let sit for about 5 minutes until foamy.
- Mix the Dough: Add eggs, flour (starting with 3 ½ cups), and salt to the yeast mixture. Mix until combined, adding more flour if too sticky. Knead in softened butter until smooth.
- Let it Rise: Cover the dough with plastic wrap and let it rise in a warm spot for about an hour or until doubled in size.
- Prepare Herb Butter: In a small bowl, mix remaining butter with garlic, parmesan cheese, basil, thyme, and sage.
- Roll Out the Dough: Once risen, roll out into a rectangle (12×18 inches) and spread the herb butter evenly over the surface.
- Shape the Bread: Roll tightly into a log from one long side. Slice lengthwise but keep one end intact; twist halves together and coil into an “S” shape on a parchment-lined baking sheet.
- Second Rise: Cover again and let rise for another 45 minutes until puffy.
- Bake: Preheat oven to 350°F (175°C). Bake for about 30-35 minutes until golden brown.
Nutrition
- Serving Size: 1 serving
- Calories: 160
- Sugar: 1g
- Sodium: 180mg
- Fat: 6g
- Saturated Fat: 4g
- Unsaturated Fat: 2g
- Trans Fat: 0g
- Carbohydrates: 22g
- Fiber: <1g
- Protein: 5g
- Cholesterol: 45mg