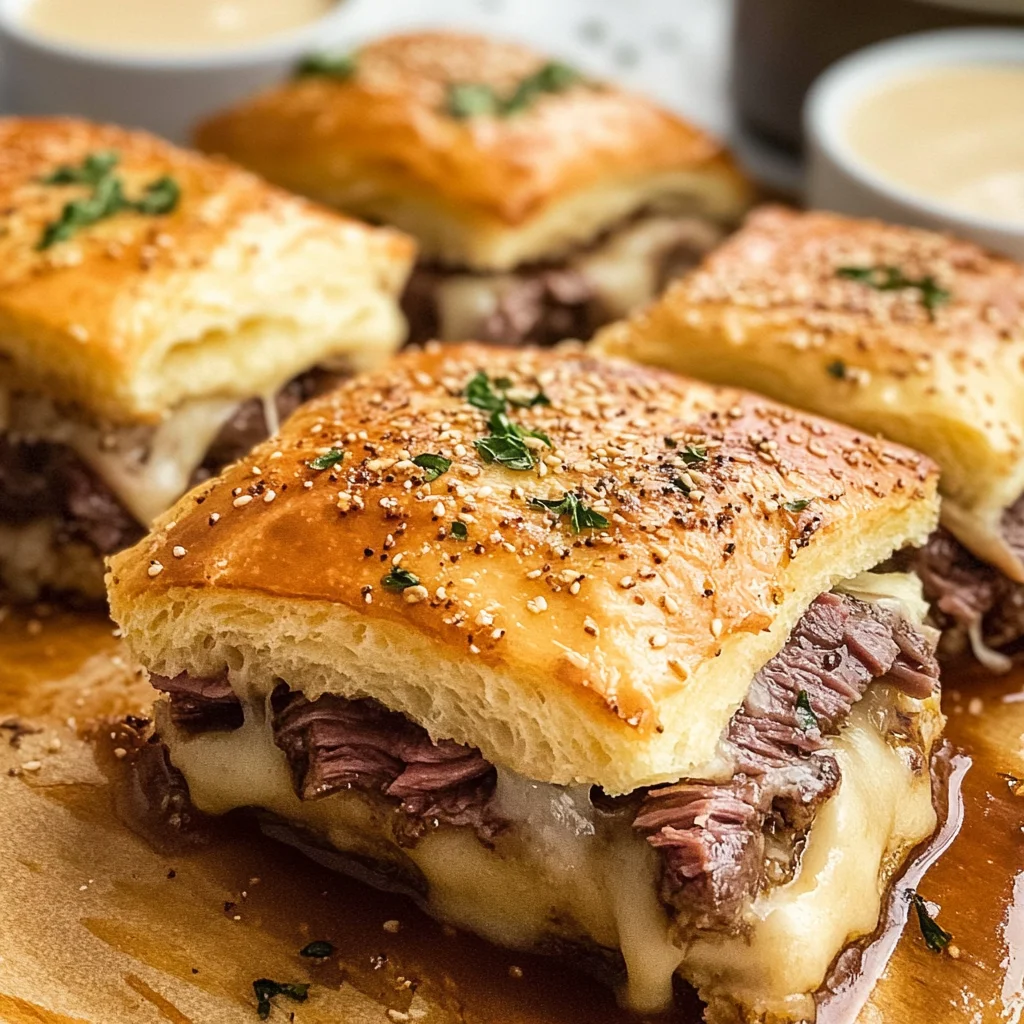
French Dip Squares
If you’re looking for a delicious and fun dish to share with family and friends, you’ve come to the right place! These French Dip Squares are not only incredibly tasty but also super easy to whip up. Imagine warm, gooey cheese and savory roast beef nestled between layers of buttery crescent rolls. Whether you’re hosting a game night or just need a quick dinner idea on a busy weeknight, these squares fit the bill perfectly. Trust me; they’ll quickly become a favorite in your home!
What makes this recipe even more special is how effortless it is. You don’t need to be a culinary whiz to impress your guests. With simple ingredients and straightforward steps, you’ll have a comforting dish that’s ready to serve in no time!
Why You’ll Love This Recipe
- Quick Preparation: You can have these French Dip Squares in the oven in under 15 minutes!
- Family-Friendly: Kids and adults alike will love the cheesy, meaty goodness packed into every bite.
- Perfect for Meal Prep: Make them ahead of time for easy lunches or snacks throughout the week.
- Endless Flavor: The combination of onion soup mix, Worcestershire sauce, and garlic adds depth that everyone will enjoy.
- Dipping Delight: The warm beef broth for dipping brings everything together for an extra special touch.
Ingredients You’ll Need
Let’s gather our ingredients! This recipe uses simple, wholesome items that you probably already have on hand. Here’s what you’ll need to create these delightful French Dip Squares:
For the Base
- 2 cans of refrigerated crescent rolls
For the Filling
- 1/2 pound deli-sliced roast beef
- 1 cup grated Swiss cheese
For the Flavorful Mixture
- 1 packet dry onion soup mix
- 1/4 cup melted butter
- 1 teaspoon Worcestershire sauce
- 1/2 teaspoon garlic powder
For Dipping
- 1 cup beef broth (for dipping)
Variations
One of the best things about these French Dip Squares is their flexibility! Feel free to make them your own with one of these variations:
- Swap the protein: Use chicken or turkey instead of roast beef for a lighter option.
- Change up the cheese: Swap Swiss cheese for provolone or mozzarella if you prefer something different.
- Add some veggies: Toss in some sautéed bell peppers or onions for added flavor and texture.
- Make it spicy: Add a pinch of red pepper flakes or some sliced jalapeños for a kick!
How to Make French Dip Squares
Step 1: Preheat the Oven
Preheat your oven to 375°F (190°C). This step is crucial because starting with a hot oven ensures that your crescent rolls bake evenly and become beautifully golden brown.
Step 2: Layer the Base
Roll out one can of crescent rolls directly into your baking dish. Press any seams together so that you have one smooth layer. This acts as the sturdy foundation for our savory filling, keeping everything deliciously contained.
Step 3: Add the Filling
Next, layer your deli-sliced roast beef evenly over the dough. Don’t be shy—make sure it covers every inch! Then sprinkle with grated Swiss cheese. The combination of flavors here is what makes these squares so irresistible!
Step 4: Prepare the Sauce
In a small bowl, mix together the dry onion soup mix, melted butter, Worcestershire sauce, and garlic powder. Drizzle this savory mixture over your cheese layer. This step enhances the overall flavor profile and adds that delicious umami boost we all love.
Step 5: Top with Dough
Now it’s time to roll out your second can of crescent rolls. Place this over your filling and pinch those seams together to create a smooth top layer. This helps keep all those wonderful flavors tucked inside while baking.
Step 6: Bake
Pop your dish into the oven and let it bake for about 15-20 minutes. Keep an eye on it until those crescent rolls turn golden brown and are fully cooked through—it’s hard to resist peeking at their progress!
Step 7: Heat the Broth
While those squares are baking away, warm up your beef broth in a small pot over medium heat. This will be perfect as a dipping sauce when it’s time to serve.
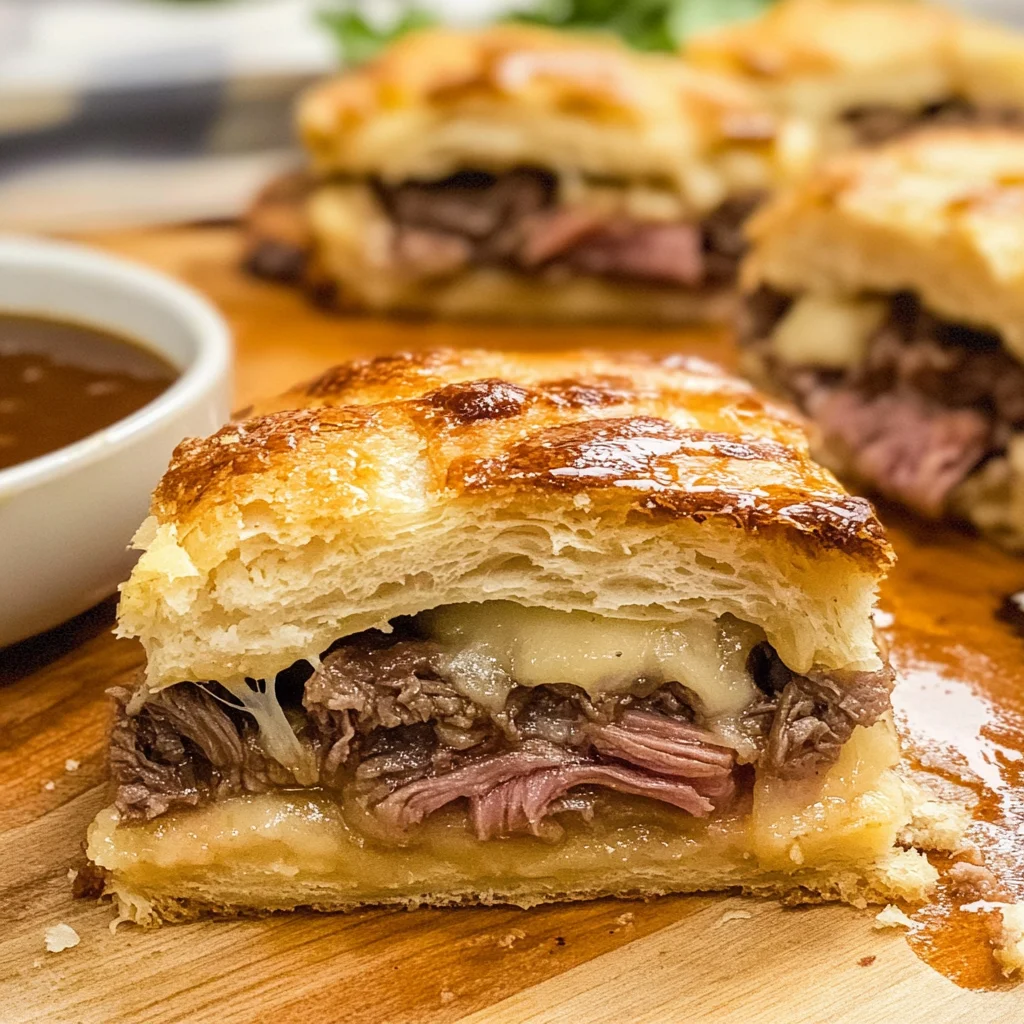
Step 8: Cool and Cut
Once baked, let your French Dip Squares cool slightly before cutting them into squares. This waiting period allows everything to set just right so that each piece holds together nicely.
Step 9: Serve
Finally, serve those scrumptious squares alongside warmed beef broth for dipping. Enjoy every cheesy bite—you’re going to love this comforting treat!
Pro Tips for Making French Dip Squares
Creating the perfect French Dip Squares can be a delightful experience, and with a few handy tips, you can elevate your dish to impress family and friends!
-
Use Fresh Ingredients: Fresh deli-sliced roast beef and quality Swiss cheese make a significant difference in flavor. Avoid pre-packaged alternatives for the best taste.
-
Seal the Dough Properly: When layering your crescent rolls, make sure to pinch the seams tightly. This ensures that the filling doesn’t leak out during baking, keeping your squares intact and delicious.
-
Customize Your Filling: Feel free to add sautéed onions or mushrooms for an extra layer of flavor. These additions can enhance the overall taste and create a more gourmet experience.
-
Adjust Seasoning to Taste: The dry onion soup mix is flavorful, but if you prefer a milder taste, consider using half the packet initially. You can always sprinkle more on top before baking.
-
Let Them Cool Before Cutting: Allowing your French Dip Squares to cool for a few minutes before cutting helps them hold their shape better. This way, every square will look as good as it tastes!
How to Serve French Dip Squares
When it comes to serving French Dip Squares, presentation is key! Whether it’s for a party or a cozy family dinner, here are some fun ideas to make your dish shine.
Garnishes
- Fresh Parsley: Chopped fresh parsley sprinkled on top adds color and a hint of freshness that complements the savory flavors of the dish.
- Dijon Mustard: A small bowl of Dijon mustard on the side provides a tangy contrast that enhances each bite when dipped!
- Sliced Green Onions: A few sliced green onions can add a nice crunch and vibrant color, making your serving platter visually appealing.
Side Dishes
- Crispy Sweet Potato Fries: These sweet yet savory fries pair perfectly with the rich flavors of French Dip Squares, adding both texture and sweetness to your meal.
- Garden Salad: A light garden salad with mixed greens, cherry tomatoes, and cucumbers offers a refreshing contrast that balances out the heaviness of the squares.
- Roasted Vegetables: Seasonal roasted vegetables like bell peppers, zucchini, and carrots provide added nutrients and make for a colorful side that complements every bite.
- Coleslaw: A tangy coleslaw adds crunch and acidity which beautifully cuts through the richness of the dipped squares while bringing an extra layer of flavor to your meal.
With these tips and serving ideas in mind, you’re all set to create an unforgettable dining experience centered around these delicious French Dip Squares! Enjoy!
Make Ahead and Storage
These French Dip Squares are perfect for meal prep, making them an excellent choice for busy weeknights or entertaining guests. You can easily make these ahead of time and store them for later enjoyment.
Storing Leftovers
- Allow the squares to cool completely before storing.
- Place them in an airtight container in the refrigerator.
- They will stay fresh for up to 3 days.
Freezing
- Cut the squares into individual portions for easier thawing.
- Wrap each square tightly in plastic wrap and then place them in a freezer-safe bag or container.
- They can be frozen for up to 2 months.
Reheating
- Preheat your oven to 350°F (175°C).
- Place the squares on a baking sheet and cover with aluminum foil to prevent them from drying out.
- Heat for about 15-20 minutes or until warmed through. You can also microwave them for about 30 seconds to 1 minute, but they may not retain their crispiness as well.
FAQs
Here are some common questions you might have about this delicious recipe!
Can I use different cheese in my French Dip Squares?
Absolutely! While Swiss cheese is traditional, you can substitute it with provolone, mozzarella, or even cheddar if you prefer a different flavor profile.
How do I make vegetarian French Dip Squares?
To create a vegetarian version of French Dip Squares, simply replace the roast beef with sautéed mushrooms or a mixture of your favorite vegetables. Use vegetable broth as your dipping sauce to keep it flavorful!
What should I serve with French Dip Squares?
These tasty squares pair perfectly with a fresh salad or roasted vegetables. You might also consider adding some crispy fries or potato wedges on the side for a complete meal.
How long do French Dip Squares last in the fridge?
If stored properly in an airtight container, French Dip Squares can last up to 3 days in the refrigerator, making them a great option for leftovers!
Final Thoughts
I hope you enjoy making these delightful French Dip Squares as much as I do! With their buttery layers and savory fillings, they’re sure to become a favorite at your gatherings and family dinners alike. Don’t hesitate to experiment with different ingredients and flavors – this recipe is all about comfort and creativity. Happy cooking, and may each bite bring warmth and joy to your table!
Dinner
French Dip Squares

If you’re in search of a delicious and easy-to-make dish for gatherings or busy weeknights, these French Dip Squares are a must-try! Imagine layers of warm, gooey Swiss cheese and savory roast beef enveloped in buttery crescent rolls. Perfect for sharing with family and friends, this recipe combines delightful flavors with simple preparation steps that anyone can master. The best part? These squares bake to golden perfection in just 15-20 minutes, making them an ideal choice for game nights or quick dinners. Serve them alongside warm beef broth for dipping, and watch as they quickly become a favorite in your home!
- Prep Time: 10 minutes
- Cook Time: 20 minutes
- Total Time: 30 minutes
- Yield: Serves approximately 6 people 1x
- Category: Main
- Method: Baking
- Cuisine: American
Ingredients
- 2 cans refrigerated crescent rolls
- 1/2 pound deli-sliced roast beef
- 1 cup grated Swiss cheese
- 1 packet dry onion soup mix
- 1/4 cup melted butter
- 1 teaspoon Worcestershire sauce (substitute with broth if desired)
- 1/2 teaspoon garlic powder
- 1 cup beef broth (for dipping)
Instructions
- Preheat the oven to 375°F (190°C).
- Roll out one can of crescent rolls into a baking dish, pressing seams together.
- Layer the deli-sliced roast beef evenly over the dough, followed by the grated Swiss cheese.
- In a bowl, mix dry onion soup mix, melted butter, Worcestershire sauce (or substitute), and garlic powder; drizzle over the cheese.
- Roll out the second can of crescent rolls over the filling and seal seams tightly.
- Bake for 15-20 minutes until golden brown.
- Heat beef broth while baking; serve warm for dipping.
Nutrition
- Serving Size: 1 square (approximately 90g)
- Calories: 320
- Sugar: 1g
- Sodium: 650mg
- Fat: 18g
- Saturated Fat: 8g
- Unsaturated Fat: 9g
- Trans Fat: 0g
- Carbohydrates: 30g
- Fiber: 1g
- Protein: 12g
- Cholesterol: 35mg